이 글이 도움되셨다면 광고 클릭 부탁드립니다 : )
2019년 구글에서 개발한 tabular data 분석을 위한 딥러닝 아키텍처인 Tabnet에 대해 간단하게 알아보겠습니다.
캐글이나 데이콘과 같은 여러 대회에서 tabular data 분석은 주로 Xgboost나 lightGBM과 같은 트리 기반 모델들의 앙상블 모델이 상위권을 차지하고 있습니다. 이미지나 텍스트, 오디오와 같은 비정형 분석에서 주로 딥러닝이 활용되고 뛰어난 성능을 보이는데 왜 정형 데이터에서는 아직 트리 기반의 방법론들이 우세한 걸까요?
Tabnet의 저자들도 이러한 부분을 언급하며 딥러닝의 장점과 트리의 장점을 가지는? 트리와 비슷?하게 학습해가는 a novel high-performance and interpretable 딥러닝 아키텍처를 제안하였습니다.
1. Tabnet?!
1.1 Contributions
논문에서 말하는 Tabnet의 4가지 주요 contribution을 살펴보겠습니다.
1. Gradient descent-based optimization으로 학습하기 때문에, 별도의 전처리가 필요 없고 flexible integration into end-to-end learning을 가능하게 한다.
*end-to-end learning?
입력에서 출력까지 '파이프라인 네트워크' 없이 한 번에 처리한다는 의미로 일반적인 머신러닝과 비교했을 때, 전처리/ 변수 선택/ 모델링의 과정이 한 번에 이뤄진다는 것을 뜻합니다.

2. Sequential attention을 사용해서 각 decision step의 feature selection 설명이 가능하고 더 잘 학습할 수 있다. 또한 이러한 feature selection은 instance-wise 하게 수행된다.
아래 그림에서 소득 예측에 Tabnet이 sequential attention을 어떻게 진행하는지 볼 수 있는데, 39세의 instance의 소득을 예측하기 위해 첫 번째 decision step에서는 직업과 관련된 feature으로 학습하고 그다음 투자 관련 feature로 순차적으로 학습하는 것을 볼 수 있습니다.

3. 위의 두가지 design으로 2가지 장점을 보이는데, 여러 데이터 셋에서 기존의 tabulat learning model보다 뛰어난 성능을 보인다는 점과 Local 하고 Global 한 해석 능력이 있다.
Local 한 해석 능력으로 각 instance의 feature 중요도와 그것들이 어떻게 combine 되는지 볼 수 있고 Global 한 해석력은 전체 train model에서 각 feature의 기여도를 확인할 수 있다고 합니다.
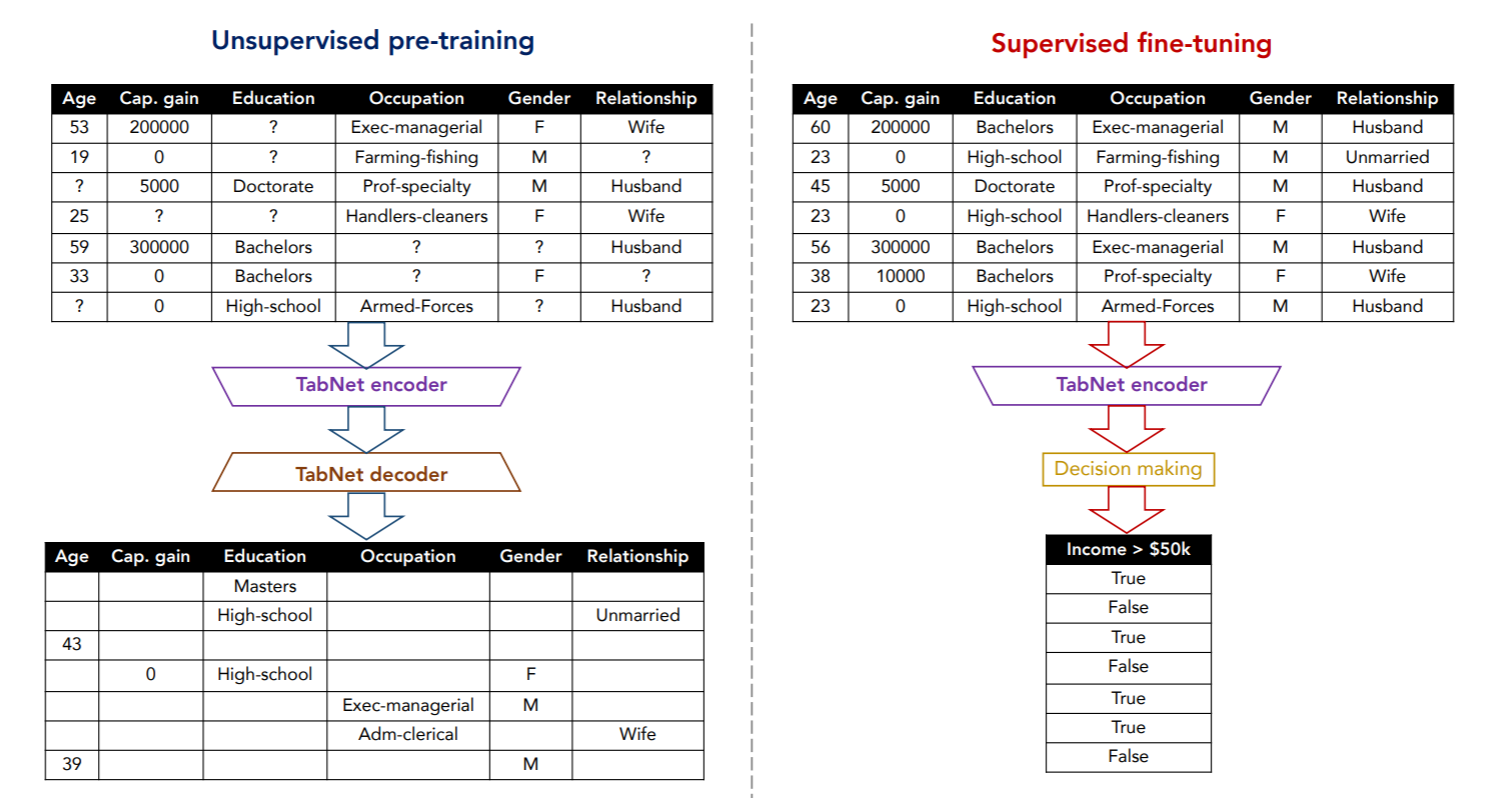
4. Self-supervised learning으로 엄청난 성능을 보인다(Tabular data에서는 처음으로).
Self-supervised learning = Unsupervised pre-training + Supervised fine-tuning
1.2 Main archtectures
Tabnet의 구조 설명에 앞서, 어떻게 하면 딥러닝이 트리처럼 학습하게 할 수 있을까요?
1.2.0 Related work_Integration of DNNs into DTs
아래 빨간 Mask 박스를 보시면, 첫 번째 Mask에서는 첫 번째 계수에만 1 나머지는 0으로 두고 두 번째 Mask에서는 두 번째 계수를 1로 두어 다른 feature의 영향도? weight를 제거하여 선택된 feature로 결정 경계를 만들어가는 트리의 학습 방법과 비슷하게 만들 수 있다고 합니다.
*ReLU = max(0, x)

1.2.1 Tabnet architecture
(a) Tabnet encoder archtecture
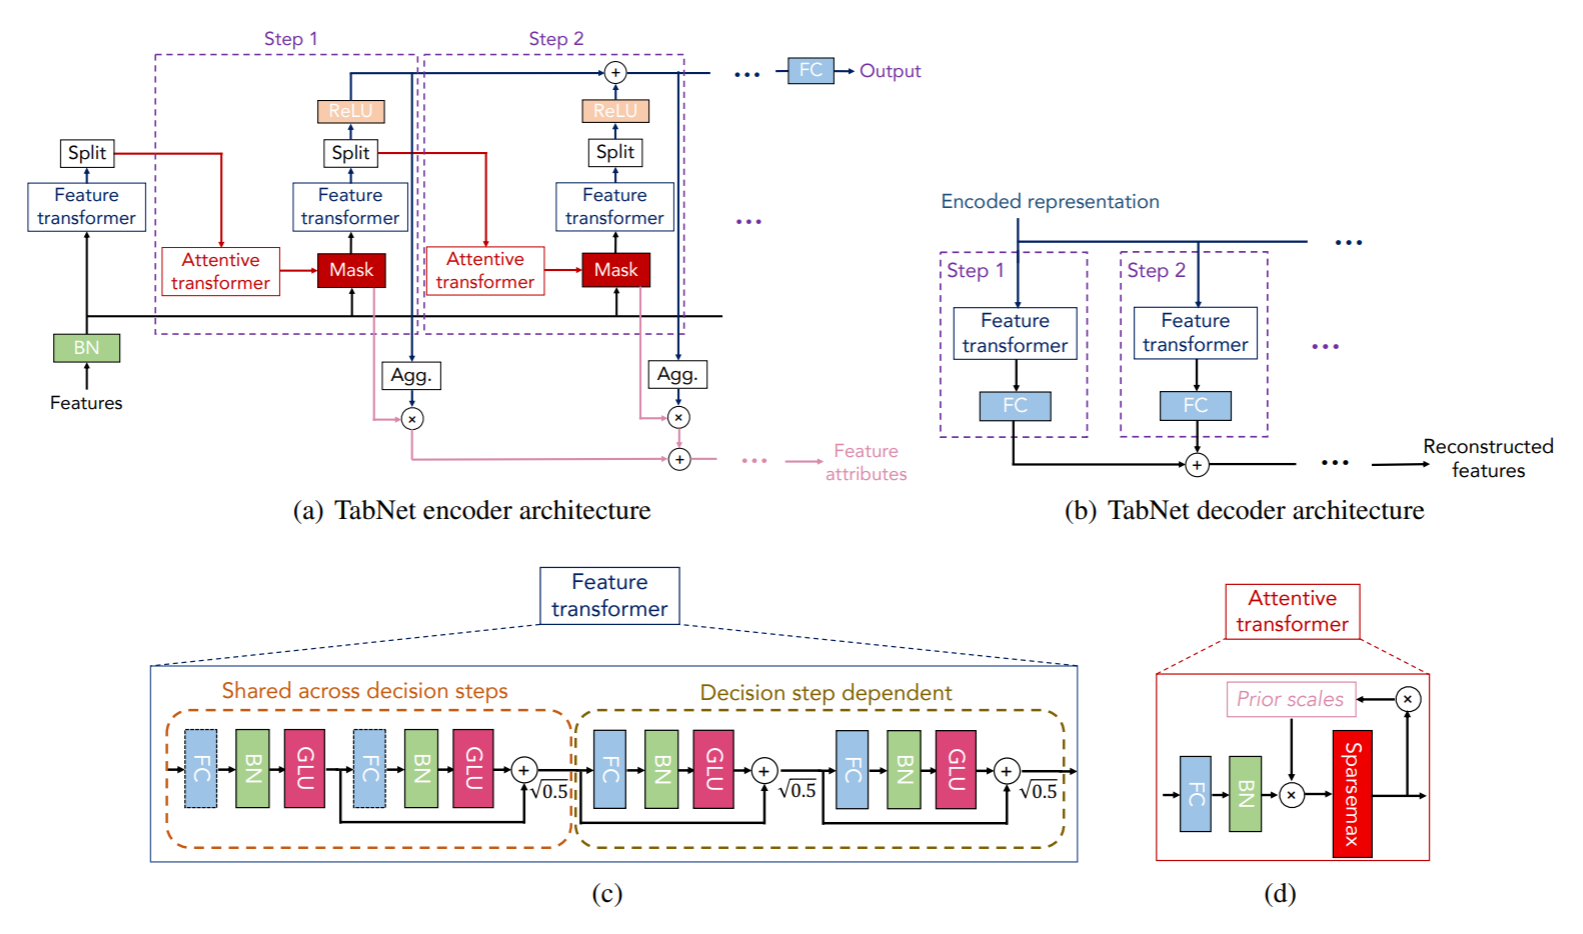
Tabnet의 encoder는 Feature transformer, Attentive transformer와 Feature masking으로 구성되어 있습니다.
매 스텝의 Split 블럭에서 이전의 feature tansformer에서 나온 representation을 output으로도 보내고 다음 attentive transformer에도 보내 mask를 sequntial하게 학습하게 됩니다. 그렇게 학습된 mask들을 모아서 global한 feature importance를 구할 수 있습니다.
(c) Feature transformer
A feature transformer block example – 4-layer network is shown, where 2 are shared across all decision steps(모든 decision step에 공유) and 2 are decision step-dependent(해당 decision step에만 영향). Each layer is composed of a fully-connected (FC) layer, BN and GLU nonlinearity.
(d) Attentive transformer
Attentive transformer는 Mask를 만들기 위해 Prior scales과 Sparsemax로 구성되는데, prior scales는 이전의 step들에서 각 feature가 얼마나 사용되었는지를 나타냅니다.
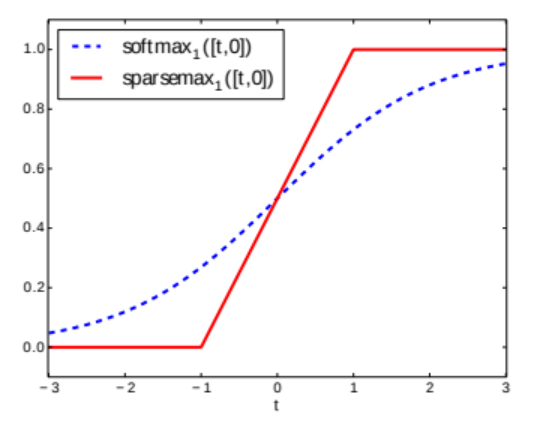
sparsemax는 회귀문제에서 Lasso나 elasticnet과 같은 변수선택하는 방법들에서 사용하는 것처럼 전구간에서 값을 가지는 softmax와 달리 구간을 나눠 이번 step에서 중요한 feature는 1 아닌 건 0으로 Mask를 만들어줍니다(feature수가 많아질수록 0, 1 사이의 기울기를 가지는 구간이 적어지고 1이 되는 구간은 극소화됨).
(e) Mask
최종 Mask는 아래와 같이 구할 수 있는데, prior scale term에서 $\gamma$값을 조정하면서 feature selection의 중복? 선택 정도를 조정할 수 있습니다. 예를 들어, $\gamma$가 1이 되면 이전에 사용된 feature는 이 후 step에서 사용될 수 없고(0이 되니까), $\gamma$가 커질수록 많은 feature를 사용할 수 있게 됩니다.
$$ M[i] = \text{sparsemax}(P[i-1] \cdot h_i(a[i-1]))\text{, where P[i] is the prior scale term} $$
$$ P[i] = \sum^i_{j=1} (\gamma-M[j])\text{, where } \gamma \text{ is a relaxation parameter} $$
2. Application for Tabnet
간단하게 Tabnet의 구조는 살펴보았고, 실제 코드는 어떻게 작성되어 있는지 저자의 github에 공유되어 있는 sample code를 따라가보도록 하겠습니다.
우선 필요한 패키지를 설치해줍니다.
# import library
!pip install pytorch_tabnet wget

from pytorch_tabnet.tab_model import TabNetClassifier
import torch
from sklearn.preprocessing import LabelEncoder
from sklearn.metrics import roc_auc_score
import pandas as pd
import numpy as np
np.random.seed(0)
import os
import wget
from pathlib import Path
from matplotlib import pyplot as plt
%matplotlib inline
github에서 활용하는 예제 데이터는 논문에서 소득 예측 예제에서 사용한 데이터와 동일합니다.
# download census-income dataset
url = "https://archive.ics.uci.edu/ml/machine-learning-databases/adult/adult.data"
dataset_name = 'census-income'
out = Path(os.getcwd()+'/data/'+dataset_name+'.csv')
out.parent.mkdir(parents=True, exist_ok=True)
if out.exists():
    print("File already exists.")
else:
    print("Downloading file...")
    wget.download(url, out.as_posix())

# load data and split
col_name = ['age','workclass','fnlwgt','education','education-num', 'marital-status', 'occupation' ,
            'relationship','race','sex','capital-gain','capital-loss','hours-pier-week','native-country',
            '<=50K']
train = pd.read_csv(out, names = col_name)
target = '<=50K'
if "Set" not in train.columns:
    train["Set"] = np.random.choice(["train", "valid", "test"], p =[.8, .1, .1], size=(train.shape[0],))

train_indices = train[train.Set=="train"].index
valid_indices = train[train.Set=="valid"].index
test_indices = train[train.Set=="test"].index
불러온 데이터를 간략히 불러오면 아래와 같고 나이, 직업, 학력, 성별 등을 활용하여 사람들의 소득 수준을 예측하려고 합니다.

간단히 카테고리 변수만 라벨인코딩을 해주고 결측인 자리를 채워줍니다.
# simple preprocessing
nunique = train.nunique()
types = train.dtypes

categorical_columns = []
categorical_dims =  {}
for col in train.columns:
    if types[col] == 'object' or nunique[col] < 200:
        print(col, train[col].nunique())
        l_enc = LabelEncoder()
        train[col] = train[col].fillna("VV_likely")
        train[col] = l_enc.fit_transform(train[col].values)
        categorical_columns.append(col)
        categorical_dims[col] = len(l_enc.classes_)
    else:
        train.fillna(train.loc[train_indices, col].mean(), inplace=True)

# Define categorical feature for categorical embeddings
unused_feat = ['Set']
features = [ col for col in train.columns if col not in unused_feat+[target]]
cat_idxs = [ i for i, f in enumerate(features) if f in categorical_columns]
cat_dims = [ categorical_dims[f] for i, f in enumerate(features) if f in categorical_columns]
# define your embedding sizes : here just a random choice
cat_emb_dim = [5, 4, 3, 6, 2, 2, 1, 10]

# check that pipeline accepts strings
train.loc[train[target]==0, target] = "wealthy"
train.loc[train[target]==1, target] = "not_wealthy"
간단한 전처리를 해준 뒤, Tabnet 모델 parameter들을 설정하고 모델을 학습합니다. 자세한 parameter 설명은 github을 참고해주세요.
# network parameters
tabnet_params = {"cat_idxs":cat_idxs,
                 "cat_dims":cat_dims,
                 "cat_emb_dim":1,
                 "optimizer_fn":torch.optim.Adam,
                 "optimizer_params":dict(lr=2e-2),
                 "scheduler_params":{"step_size":50, # how to use learning rate scheduler
                                 "gamma":0.9},
                 "scheduler_fn":torch.optim.lr_scheduler.StepLR,
                 "mask_type":'entmax' # "sparsemax"
                 "gamma" : 1.3 # coefficient for feature reusage in the masks
                }

clf = TabNetClassifier(**tabnet_params)
# training
X_train = train[features].values[train_indices]
y_train = train[target].values[train_indices]
X_valid = train[features].values[valid_indices]
y_valid = train[target].values[valid_indices]
X_test = train[features].values[test_indices]
y_test = train[target].values[test_indices]
max_epochs = 100 if not os.getenv("CI", False) else 2
# This illustrates the warm_start=False behaviour
save_history = []
for _ in range(2):
clf.fit(
X_train=X_train, y_train=y_train,
eval_set=[(X_train, y_train), (X_valid, y_valid)],
eval_name=['train', 'valid'],
eval_metric=['auc'],
max_epochs=max_epochs , patience=20,
batch_size=1024, virtual_batch_size=128,
num_workers=0,
weights=1,
drop_last=False
)
save_history.append(clf.history["valid_auc"])# plot losses
plt.plot(clf.history['loss'])
# plot auc
plt.plot(clf.history['train_auc'])
plt.plot(clf.history['valid_auc'])
# plot learning rates
plt.plot(clf.history['lr'])
학습된 모델로 prediction을 해봅니다.
# prediction
preds = clf.predict_proba(X_test)
test_auc = roc_auc_score(y_score=preds[:,1], y_true=y_test)


preds_valid = clf.predict_proba(X_valid)
valid_auc = roc_auc_score(y_score=preds_valid[:,1], y_true=y_valid)

print(f"BEST VALID SCORE FOR {dataset_name} : {clf.best_cost}")
print(f"FINAL TEST SCORE FOR {dataset_name} : {test_auc}")
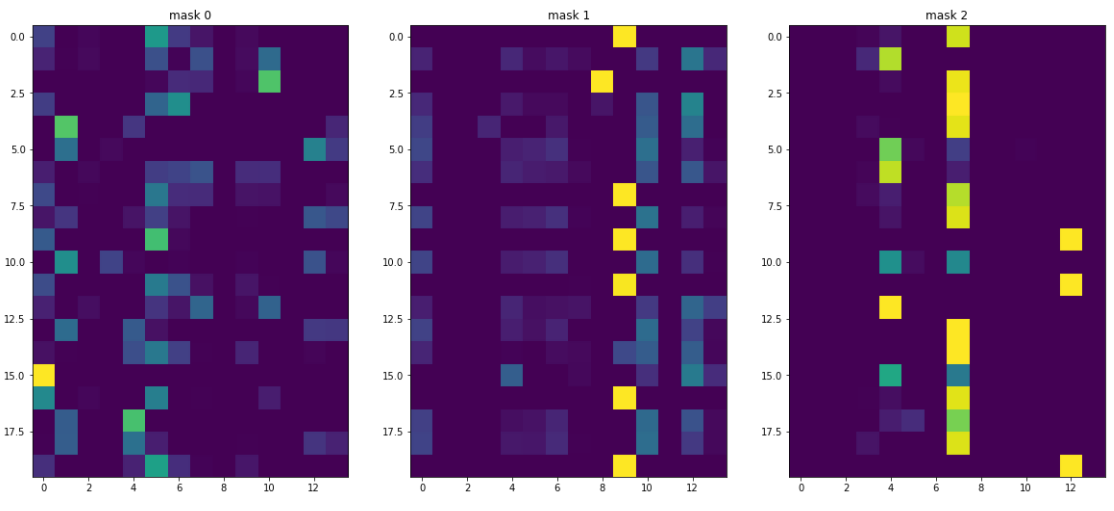
아래에서는 Tabnet이 가지는 특징인 해석력을 살펴볼 수 있습니다.
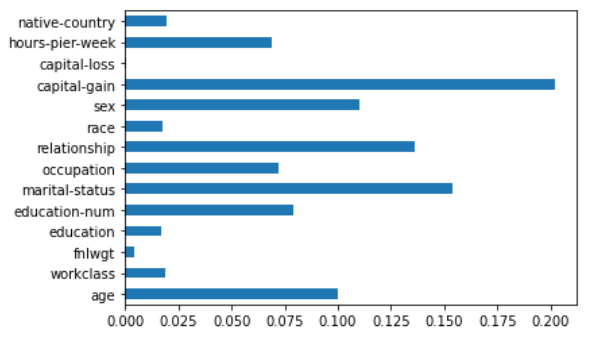
Feature importance로 Global explainability를 확인할 수 있고, Mask값으로 Local explainability를 볼 수 있습니다.
# global
feat_importances = pd.Series(clf.feature_importances_, index=features)
feat_importances.plot(kind='barh')

#local
explain_matrix, masks = clf.explain(X_test)
fig, axs = plt.subplots(1, 3, figsize=(20,20))

for i in range(3):
    axs[i].imshow(masks[i][30:50])
    axs[i].set_title(f"mask {i}")
아래 그래프를 보시면, capital-gain이 소득 예측하는 가장 영향을 많이 미쳤고, 아래 step별 mask를 보시면 어떤 변수가 특정 사람의 소득 예측에 얼마나 많은 영향을 미치는지도 확인할 수 있습니다.
Tabnet에 대해 간략히 살펴보았는데요. 기존의 Tree & Shap 으로 모델을 만들고 해석을 해왔었는데 Tabnet을 활용하면 각 instance별 step별 feature 영향도도 확인할 수 있어 나름의 장점이 있는 것 같습니다.
하지만 아직도 여러 대회에서는 트리기반 앙상블 모델이 상위권에 있는 걸 보면, tabnet이 만능은 아닌 것 같고 전처리가 필요 없다고는 말하지만 전처리를 해야 모델 성능이 좋아질 것 같습니다.
아직은 tabular data에서 이 방법이 최고다 하는 방법은 없는 것 같고 우리가 분석하는 데이터의 특성에 맞는 모델을 잘 찾거나 앙상블 해야 할 것 같습니다.
'Review > 논문 리뷰' 카테고리의 다른 글
| [논문 리뷰] 이상치 탐지 | DevNet, An End-to-end Anomaly Score Learning Network (0) | 2022.11.13 |
|---|---|
| [논문 리뷰] 이상치 탐지 | Adversarial Autoencoder (0) | 2022.11.03 |
| [논문 리뷰] 페이스북 시계열예측 모델 | prophet (1) | 2022.10.19 |
| [논문 실습] 페이스북 시계열예측 모델 | prophet with 제주도 관광객 예측 (1) | 2022.10.19 |
| [논문 리뷰] 이미지 클러스터링 | Deep Adaptive Image Clustering(2017) (0) | 2022.10.19 |