이 글이 도움되셨다면 광고 클릭 부탁드립니다 : )
이번 포스팅에서는 간단하게 Flask로 웹 모델 서빙 실습했던 노트북을 정리해보려고 합니다.
전체적인 코드는 아래 자료의 소스를 활용하여 진행하였으며, 중간중간 Flask 모델 서빙 구현에 필요한 개념이나 구조를 추가하였습니다.
https://www.analyticsvidhya.com/blog/2020/04/how-to-deploy-machine-learning-model-flask/
How to Deploy Machine Learning Models using Flask (with Code)
How can you deploy a machine learning model into production? That's where we use Flask, an awesome tool for model deployment in machine learning.
www.analyticsvidhya.com
Flask?!
Micro Web framework로 간단한 API 서버를 만드는 데에 특화되어 있는 파이썬 기반 웹 프레임워크입니다.
Framework vs Library
둘 다 필요한 기능을 재사용 가능하도록 구현한 거지만, Framework은 framework가 개발자의 코드를 실행하는 개념이고 Library는 개발자의 코드 안에서 실행되는 개념으로 Framework가 더 큰 개념
각종 Library와 코드가 모여 Framework이 되고 한 프로젝트에서 Framework는 하나만 쓸 수 있음
실습
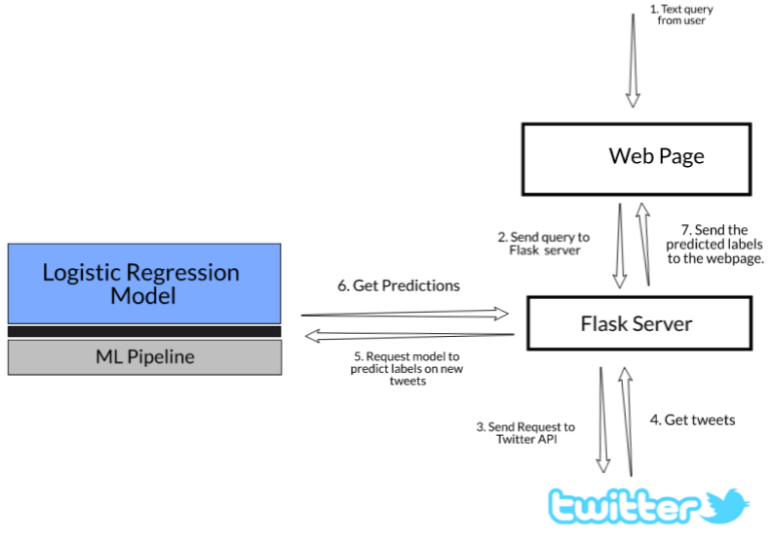
Flask를 활용하여 TF-IDF와 로지스틱 모델을 배포/서빙해서 웹 환경에서 새로운 데이터에 대해 모델 예측이 가능한 웹페이지를 만들어 보겠습니다.
만들어진 웹에서 특정 주제로 검색을 하게되면 해당 검색어와 관련 있는 트윗을 수집하고 조회된 트윗 중에서 성차별/인종차별과 관련한 트윗인지 평범한 트윗인지를 판별된 결과를 확인할 수 있습니다.
필요한 라이브러리를 불러오고 데이터를 확인합니다.
!pip install flask

# importing required libraries
import pandas as pd
from sklearn.feature_extraction.text import ENGLISH_STOP_WORDS, TfidfVectorizer
from sklearn.linear_model import LogisticRegression
from sklearn.pipeline import Pipeline
from sklearn.metrics import f1_score
from sklearn.model_selection import train_test_split
변수 정의
- id: Unique number for each row
- label: For the normal tweet, it will be 0 and for the racist or sexist tweet, it will be 1. There are 29,720 zeros and 2,242 one’s
- tweet: Tweet posted on Twitter
# read the dataset
data = pd.read_csv('twitter_sentiments.csv')

# view the top rows
data.head()
#	id	label	tweet
#0	1	0	@user when a father is dysfunctional and is s...
#1	2	0	@user @user thanks for #lyft credit i can't us...
#2	3	0	bihday your majesty
#3	4	0	#model i love u take with u all the time in ...
#4	5	0	factsguide: society now #motivation

data.info()
#<class 'pandas.core.frame.DataFrame'>
#RangeIndex: 31962 entries, 0 to 31961
#Data columns (total 3 columns):
# #   Column  Non-Null Count  Dtype
#---  ------  --------------  -----
# 0   id      31962 non-null  int64
# 1   label   31962 non-null  int64
# 2   tweet   31962 non-null  object
#dtypes: int64(2), object(1)
#memory usage: 749.2+ KB

# train test split
train, test = train_test_split(data, test_size = 0.2, stratify = data['label'], random_state=21)

# get the shape of train and test split.
train.shape, test.shape
## >> ((25569, 3), (6393, 3))
TF-IDF?
- Term Frequency 1개의 문서 안에서 특정 단어의 등장 빈도
- Document Frequency 특정 단어가 나타나는 문서의 수
- Inverse DF(문서의 빈도에 특정 식을 취함)
- 단순히 많이 등장하는 빈도수로 그 단어의 가치를 정하는 것(TF)이 아니라, 많이 등장하는 단어들에게는 일종의 페널티를 줘서, 단어 빈도의 스케일을 맞춰주는 기법(가중치)
- 여러 문서로 이루어진 문서군이 있을 때 어떤 단어가 특정 문서 내에서 얼마나 중요한 것인지를 나타내는 통계적 수치
- 문서의 핵심어 추출, 문서 간 유사도 계산에 활용
# create a TF-IDF vectorizer object
tfidf_vectorizer = TfidfVectorizer(lowercase= True, max_features=1000, stop_words=ENGLISH_STOP_WORDS)

# fit the object with the training data tweets
tfidf_vectorizer.fit(train.tweet)

# transform the train and test data
train_idf = tfidf_vectorizer.transform(train.tweet)
test_idf  = tfidf_vectorizer.transform(test.tweet)

# create the object of LinearRegression Model
model_LR = LogisticRegression()

# fit the model with the training data
model_LR.fit(train_idf, train.label)

# predict the label on the traning data
predict_train = model_LR.predict(train_idf)

# predict the model on the test data
predict_test = model_LR.predict(test_idf)

# f1 score on train data
f1_score(y_true= train.label, y_pred= predict_train)
## >> 0.4888178913738019

f1_score(y_true= test.label, y_pred= predict_test)
## >> 0.45751633986928114
모델 파이프라인을 정의하고 모델을 학습합니다.
- Step 1: Create a TF-IDF vector of the tweet text with 1000 features as defined above
- Step 2: Use a logistic regression model to predict the target labels
# define the stages of the pipeline
pipeline = Pipeline(steps= [('tfidf', TfidfVectorizer(lowercase=True,
                                                      max_features=1000,
                                                      stop_words= ENGLISH_STOP_WORDS)),
                            ('model', LogisticRegression())])

# fit the pipeline model with the training data
pipeline.fit(train.tweet, train.label)

# sample tweet
text = ["Virat Kohli, AB de Villiers set to auction their 'Green Day' kits from 2016 IPL match to raise funds"]

# predict the label using the pipeline
pipeline.predict(text)
## >> array([0])

# import joblib
from joblib import dump

# dump the pipeline model
dump(pipeline, filename="text_classification.joblib")

# import joblib
from joblib import load

# sample tweet text
text = ["Virat Kohli, AB de Villiers set to auction their 'Green Day' kits from 2016 IPL match to raise funds"]

# load the saved pipleine model
pipeline = load("text_classification.joblib")

# predict on the sample tweet text
pipeline.predict(text)
## >> array([0])
이제는 트위터를 실시간으로 조회하기 위한 API작업이 필요한데요, 이 때 twitter API 개발자 계정 신청을 해서 각자 부여된 API Key가 있어야지 트위터 내용을 불러올 수 있습니다. 아래 트위터 개발자 페이지에서 인증을 받으면 API Key를 받을 수 있습니다.
https://developer.twitter.com/en/apps
https://developer.twitter.com/en/apps
developer.twitter.com
!pip3 install tweepy

# import required libraries
import tweepy
import time
import pandas as pd
pd.set_option('display.max_colwidth', 1000)

# api key
api_key = "각자 부여받은 값 입력"
# api secret key
api_secret_key = "각자 부여받은 값 입력"
# access token
access_token = "각자 부여받은 값 입력"
# access token secret
access_token_secret = "각자 부여받은 값 입력"

# authorize the API Key
authentication = tweepy.OAuthHandler(api_key, api_secret_key)

# authorization to user's access token and access token secret
authentication.set_access_token(access_token, access_token_secret)

# call the api
api = tweepy.API(authentication, wait_on_rate_limit=True)

def get_related_tweets(text_query):
    # list to store tweets
    tweets_list = []
    # no of tweets
    count = 2
    try:
        # Pulling individual tweets from query
        for tweet in api.search(q=text_query, count=count):
            # print(tweet.text)
            # Adding to list that contains all tweets
            tweets_list.append({'created_at': tweet.created_at,
                                'tweet_id': tweet.id,
                                'tweet_text': tweet.text})
        return pd.DataFrame.from_dict(tweets_list)

    except BaseException as e:
        print('failed on_status,', str(e))
        time.sleep(3)
API가 잘 작동하는지 "corona"로 검색해보겠습니다.
get_related_tweets('corona')
자 이제 드디어 Flask로 검색어 입력-관련 트윗 조회-모델 판별이 가능한 웹을 만들어보겠습니다.
# importing the required libraries
from flask import Flask, render_template, request, redirect, url_for
from joblib import load
# from get_tweets import get_related_tweets

# load the pipeline object
pipeline = load("text_classification.joblib")

# function to get results for a particular text query
def requestResults(name):
    # get the tweets text
    tweets = get_related_tweets(name)
    # get the prediction
    tweets['prediction'] = pipeline.predict(tweets['tweet_text'])
    # get the value counts of different labels predicted
    data = str(tweets.prediction.value_counts()) + '\n\n'
    return data + str(tweets)

# start flask
app = Flask(__name__)

# render default webpage
@app.route('/')
def home():
    return render_template('home.html')

# when the post method detect, then redirect to success function
@app.route('/', methods=['POST', 'GET'])
def get_data():
    if request.method == 'POST':
        user = request.form['search']
        return redirect(url_for('success', name=user))

# get the data for the requested query
@app.route('/success/<name>')
def success(name):
    return "<xmp>" + str(requestResults(name)) + " </xmp> "

if __name__ == '__main__':
    app.run() # 앱 실행
API에 대해 간단히 부연 설명을 하자면, API는 클라이언트, 서버와같은 서로 다른 프로그램에서 요청과 응답을 주고받을 수 있게 만든 체계이고 가장 기본이 되는 요청으로 CRUD(Creat, Read, Update, Delete)가 있습니다.
이상, Flask로 모델 서빙하는 방법에 대해 살펴보았습니다.
'Programming > Python' 카테고리의 다른 글
| Poetry 분리환경 구축기 A-Z (docker-poetry-jupyter 조합) (0) | 2024.04.07 |
|---|---|
| PyOD 라이브러리로 간단하게 이상치 탐지하기 (3) | 2022.10.19 |
| plotly와 dash로 만드는 python dashboard 기초 (0) | 2022.10.19 |
| PyTorch란 무엇일까?! with GANomaly (0) | 2022.10.19 |
| Pandas Cheat Sheet (0) | 2022.10.19 |